The Virtual Private Network (VPN) technology of Dell™ SonicWALL™ allows a network administrator to create a secure and extensive VPN which can be managed and administered easily. To install an SSL certificate, you’ll have to do sonicwall ssl vpn configuration.
Quick SSL installation Process for SonicWall SSL VPN
![]()
Step 1: Download and Extract the SSL Certificate Files
After completing the checkout process, the Certificate Authority (CA) will send you the SSL certificate via Email. It will be included in a zip file. Download and extract it on your server directory or on the storage drive.
For the complete installation of SSL certificate on SonicWall SSL VPN, first you need to import SSL certificate and after that, you need to import the CA certificate.
Step 2: Import the SSL Certificate
- Rename your ‘domainname.crt’ file with a new name as ‘server.crt’
- Similarly, rename your key file with ‘server.key’,
- Now, create a zip file that includes the server.crt file, server.key file and other files that you have extracted from your server directory or storage drive.
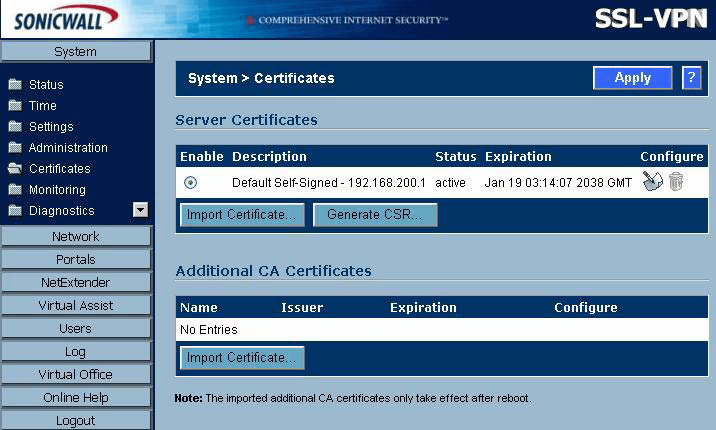
- Now, on SonicWall VPN, click on System and then on the Certificate Folder.
- Here you will be able to view the current SSL certificate along with buttons Import Certificate and Generate new CSR.
- Click on the Import Certificate button and then on Browse.
- Browse for the *.Zip file, having server.crt and server.key file, which you have created recently. Now, press the Upload button.
Important Note: During file upload SonicWall SSL VPN, allow users to create a private key password for the security of certificate files, please remember, it is an optional feature, which is not mandatory to use.
- After uploading the file you can view your SSL certificate on System > Certificates directory of SonicWall SSL VPN.
Step 3: Import CA certificate
- On your SonicWall SSL VPN, click on System > Certificates directory. Skip to the next step, if you are already there.
- Here you can find ‘Additional CA Certificates’ section. This is where you need to import your CA certificate.
- Click on the ‘Important Certificates’ button and then click on ‘Browse’. Now, browse the *.zip file that you downloaded in previous steps and then press ‘Upload’.
Important Note: Make sure the certificate files are in *.PEM format, because SonicWall SSL VPN will only accept the *.zip file which includes certificate files that are formatted with *.pem extension. If your certificate files are not in *.pem format, you can convert them by using our free SSL converter tool.
- After completion of the file upload, you can view your SSL certificate on the System > Certificates directory of SonicWall SSL VPN.
Additional Resources:
- SonicWall SSL VPN Support
- SSL Converter
- SSL Installation Checker
- How to Install an SSL Certificate on Red Hat Linux Apache Server
- How to Install SSL Certificate on Cisco Secure Access Control Server (ACS)
- How to Install an SSL Certificate on Ubuntu Server using Apache
- A Step-by-Step Guide on How to Install an SSL certificate on H-Sphere
SSL Certificate for SonicWall SSL VPN
![]() SonicWall SSL VPN only accepts SSL Certificate from a genuine and trusted SSL Certificate Authority. Buy trusted SSL Certificate from at a cheap price with heavy discount rates.
SonicWall SSL VPN only accepts SSL Certificate from a genuine and trusted SSL Certificate Authority. Buy trusted SSL Certificate from at a cheap price with heavy discount rates.


