A Quick & Easy Guide on How to Install an SSL Certificate on a WordPress Website That’s Hosted on BlueHost
Almost all hosting providers offer free SSL/TLS certificates with their hosting plans, and BlueHost is no different. No matter which hosting plan you choose, you’ll be provided with a free Let’s Encrypt SSL certificate.
But, if you’re looking to go with an SSL/TLS certificate from respected CAs like Sectigo or Comodo, you’ll need to follow certain installation steps. So, if you’re wondering how to install an SSL certificate on a WordPress website that you’ve hosted on BlueHost, then keep reading this guide.
Install SSL on Your WordPress Website Hosted on BlueHost
Installing an SSL certificate on your WordPress website hosted on BlueHost is divided into two different sections. Firstly, you’ll need to generate a private key & CSR. Then secondly, you’ll have to submit your generated CSR to your CAs website from whom you’re purchasing an SSL/TLS certificate from.
Here’s How to Generate a Private Key & CSR (Certificate Signing Request)
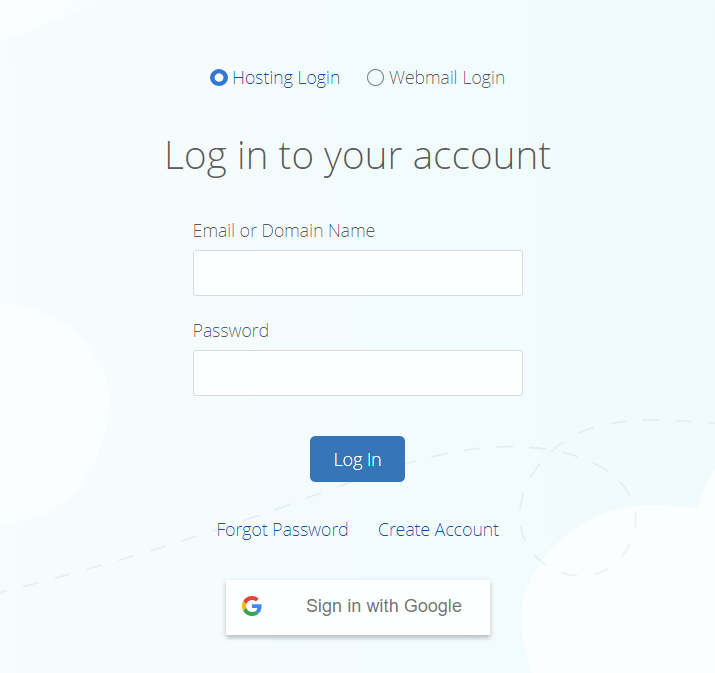
- Go to the Bluehost panel and login into your account.
- Once you login into your Bluehost account, go to the ‘Advanced’ tab and scroll down to the ‘Security section.’
- Click on the icon TLS/SSL Manager.
- Go to the ‘Private Keys’ and click on ‘Generate, view, upload, or delete your private keys.’
- Once the Private Keys page opens, go to the ‘Generate a New Key’ section and select the Key Size from the two given options: 2048 or 1024.
- Click on the button Generate, and the Private Key will be generated instantly.
- Click on “Return to SSL Manager,” and it’ll take you back to the SSL Manager page.
- Once the SSL Manager page loads, under the Certificate signing requests option, click on “Generate, view or delete SSL certificate signing requests.”
- Now, enter the domain and the other requested information in the form and press the ‘Generate’ button. If all the information added by you is correct, you’ll see your CSR generated.
Here Are the Quick Steps to Submit CSR to the SSL Vendor of Your Choice
After generating the CSR, go to your SSL provider (such as CheapSSLsecurity.com) and complete the steps of purchasing an SSL/TLS certificate of your choice, such as DV or OV.
You’ll need to provide your generated CSR and other documents that are asked for by them to validate your authenticity based on your choice of SSL/TLS certificate.
- Once the verification is completed, you’ll get an SSL/TLS certificate issued to the email address you registered when purchasing the certificate.
- Now, go to the SSL Manager and, under the Certificate option, click, “Generate, view, upload or delete SSL certificates.”
- Download the CRT extension file you received in your email, open it using any text editor (such as Notepad) and copy all content in that .crt file. Now, paste it in the provided textbox or else browse your computer for the downloaded .crt file and upload it. Likewise, repeat the same step for the CA Bundle file (if you’ve received it) and upload it. Lastly, click on the ‘Upload Certificate’ button and it’ll upload and install your SSL certificate.
- Once you upload the certificate and install it, go to your website homepage and check it. It should be displaying a secure HTTPS connection.
Note:
- Lastly, it’s recommended that you keep the Private Key and CRT file safe separately in your system as a backup copy because the KEY and CRT files are needed to install a certificate to the server.
Wrapping Up
Here, we’ve taken you through the steps of generating a Private Key and CSR (Certificate Signing Request) and installing an SSL/TLS certificate. We hope this step-by-step article helps you when you need to install a third-party SSL certificate of your choice from trusted CAs like FastSSL.
Why Should You Choose to Pay For an SSL/TLS Certificate?
A free SSL certificate won’t be a good option in all scenarios. For instance, if your WordPress website collects information from the user, it’s recommended you go for an SSL/TLS certificate provided by a respected CA.
Furthermore, paid SSL also offers the benefit of Liability Protection, which is missing in the free SSL/TLS certificate. For instance, if anything goes wrong due to a CAs mistake and your site gets breached or hacked, you’ll receive a certain amount of money as a recovery from the CA for the losses you incurred.
Lastly, you also get instant support from SSL experts. On the other hand, with a free SSL certificate, you’ll need to depend on yourself if any issues arise during SSL installation.
WordPress SSL Certificates
Enhance your WordPress website security with a WordPress SSL certificate in a few minutes. It comes from a globally trusted Certificate Authority with 256-bit SSL encryption, $10K-$50K warranties, Daily WordPress security scans, and more.