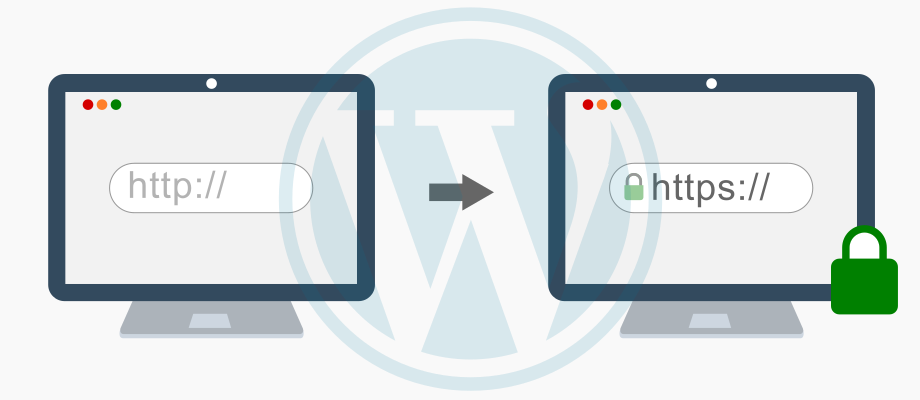
An Easy Guide on How to Change Your WordPress Site from HTTP to HTTPS Without Technical Knowledge
Do you have a WordPress website, and you’re getting “Not Secure” written beside the URL bar whenever you try opening it? If that’s the case, it means an SSL/TLS certificate is not installed on your WordPress website.
Secondly, if you’re questioning how to change HTTP to HTTPS in WordPress or how to install this so-called SSL/TLS certificate, so the “Not Secure” warning goes away, then keep reading. Here, we’ll guide you on how to change your WordPress website’s URL from HTTP to HTTPS.
To change your WordPress site from HTTP to HTTPS, you’ll first need to have an SSL/TLS certificate. Furthermore, you should also know that different types of SSL/TLS certificates are available. So, you’ll need to decide which one is right for you.
You’ll also need to go through a specific SSL validation process before you get your certificate. What type of process you go through depends upon which type of SSL certificate you’ve purchased.
Recommended Read: Install SSL Certificate on cPanel/WHM Within Minutes
Steps to Change Your WordPress Website from HTTP to HTTPS and Remove the “Not Secure” Warning
Once you purchase and install an SSL/TLS certificate, follow the below steps to change the WordPress site from HTTP to HTTPS.
There are two different methods you can go with.
Change WordPress Website from HTTP to HTTPS Using WordPress Plugin
This is the easiest method and preferable for those who don’t have any prior experience of shifting WordPress websites from HTTP to HTTPS. All you need to do is install a WordPress plugin named Really Simple SSL.
For installing the plugin:
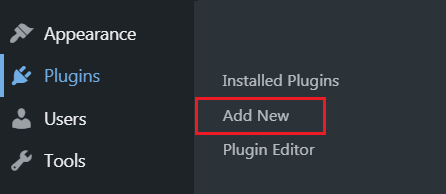
- Login to your WordPress Admin panel.
- Go to Plugins and select Add New
- Once you click on “Add New,” an Add Plugins page will open. Now, from the search bar, type “Really Simple SSL.“
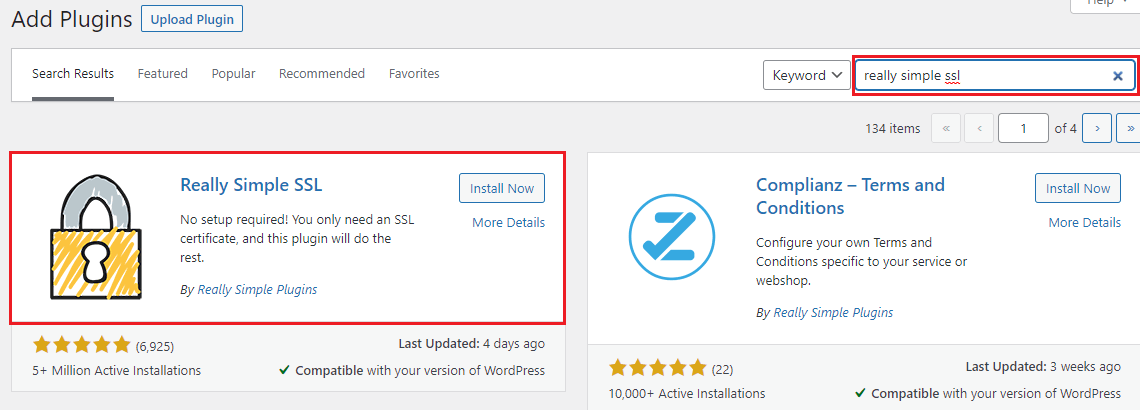
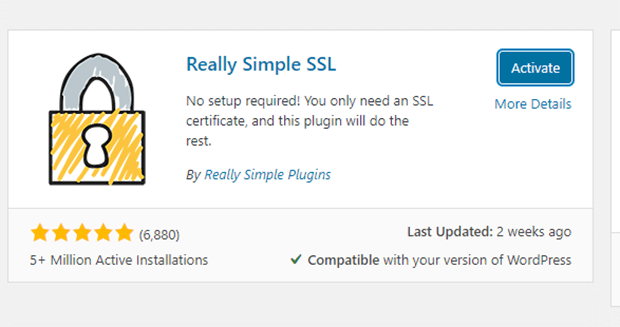
- Click on Install and then Activate it.
- Go to Settings and select SSL. It’ll open the “Really Simple SSL” Settings Page.
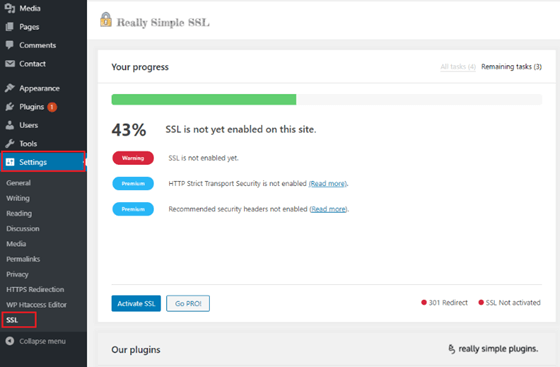
Once you’re on the page, click the Activate SSL button, and it’ll take care of the things such as always loading your website using a secure HTTPS connection. Replacing content from HTTP to secure HTTPS, changing site and home URL to secure HTTPS, and automatically handling and fixing issues.
If you go for the Really Simple SSL Pro version, then it’ll also submit your website to the HSTS Preload List, help to find mixed content errors, and automatically fix it that usually hard to detect.
Some of the things the Really Simple SSL plugin do for you behind the scenes are:
- Verify your SSL/TLS Certificate.
- Change your WordPress site from HTTP to HTTPS.
- Setup your WordPress website to use a secure HTTPS connection.
- Find URLs within your content that loads from an insecure HTTP connection and try to fix it.
Note:
Once the plugin fixes the mixed content issue, your website may show some performance issues, but you can mitigate this by using a caching plugin.
Change WordPress Website from HTTP to HTTPS Manually
If you’re experienced and know how to handle the website backend properly, you can choose this option. As the name implies, you’ll need to do everything manually, including troubleshooting all the issues and editing the WordPress file. However, one benefit you get is that it’s a more efficient and performance-optimized solution. But it can break your website if you do something wrong.
If you have chosen this method, you may also need to edit the WordPress theme and code file on your own. However, if you aren’t experienced with this and know a WordPress developer, you can get their help. First, go to Settings >> General. Then update your WordPress Address (URL) and Site Address (URL) from HTTP to HTTPS and click on the “Save” button at the bottom.

Once you save the changes, WordPress will log you out automatically, and you’ll need to re-login. Now, you’ll have to set your WordPress website up for redirects from insecure HTTP to secure HTTPS. For that, you’ll need to add the below-mentioned code into the .htaccess file. (It’s only for the Apache server)
<IfModule mod_rewrite.c>
RewriteEngine On
RewriteCond %{HTTPS} off
RewriteRule ^(.*)$ https://%{HTTP_HOST}%{REQUEST_URI} [L,R=301]
</IfModule>
If your website uses the Nginx server, you’ll have to add the below-mentioned code for redirecting the website from HTTP to HTTPS in the configuration file.
server {
listen 80;
server_name example.com www.example.com;
return 301 https://www.domainexample.com$request_uri;
}
Note: Replace domainexample.com with your website name.
By following the steps mentioned above, you’ll successfully prevent the WordPress HTTPS’s not working error as your entire WordPress website will start loading on secure HTTPS.
However, for forcing SSL and HTTPS on your WordPress website, you’ll need to configure SSL within the wp-config.php file further. Add the below-mentioned code in the wp-config.php file just above the line “That’s all, stop editing!”
define(‘FORCE_SSL_ADMIN’, true);
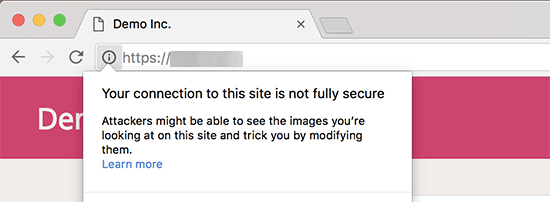
Once you complete the last-mentioned step, you’ll still face the issue of mixed content errors. Mixed Content errors are caused due to the loading of content like images, stylesheets, or scripts through insecure HTTP connections in the URLs. For instance, your website may load securely using an HTTPS connection, but now you’ll see a circle instead of Not Secure like below:
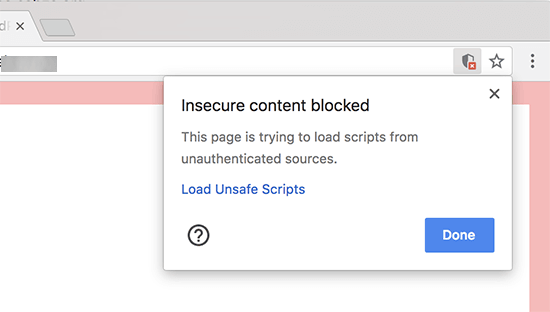
Usually, browsers nowadays automatically block all unsafe scripts and resources. And you’ll see a notification saying, “Insecure content is blocked” at the address bar.
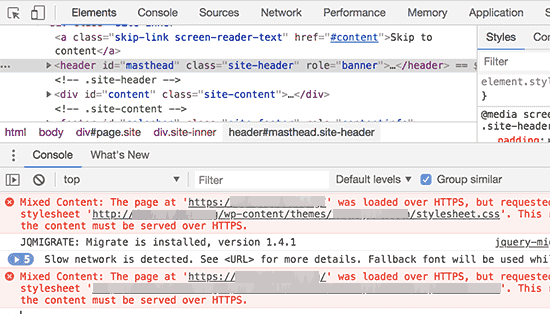
You can figure out which content is getting served with insecure HTTP protocol with the help of Google Chrome’s Inspect tool. All the items and content served through HTTP will be displayed with the warning “Mixed Content Error.”
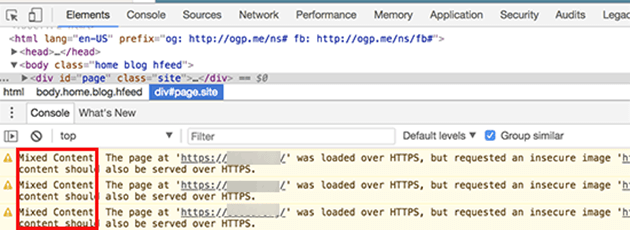
You’ll notice that most of this insecure content that’s creating Mixed Content errors are due to image files, embed data stored within your WordPress website database, and some scripts and stylesheets that are loaded by installed WordPress plugins and themes.
Here’s How to Fix a Mixed Content Error in Your WordPress Database
First, you’ll need to find all the URLs of your website within the database that starts with HTTP and replace it with the secure HTTPS. Instead of searching for every URL, you can easily do it with the help of plugins like Better Search Replace.
Once you install and activate the plugin (using the same steps mentioned earlier to install and activate a plugin), go to Tools >> Better Search Replace page.
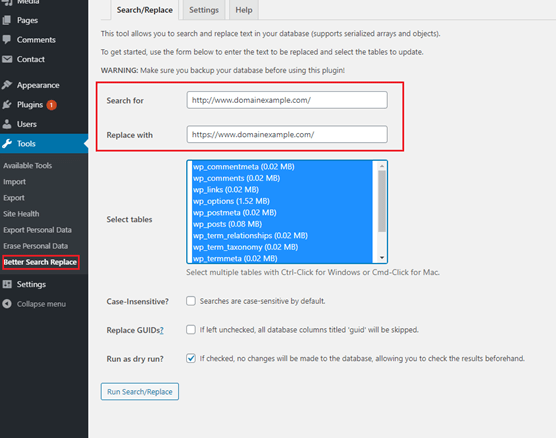
In that, you’ll see two text boxes, “Search for” and “Replace with.” Put the old URL of the website, which is in HTTP in “Search for,” and then put the new URL, the one with secure HTTPS, in the following field “Replace with.” After that, in “Select tables,” select all WordPress tables.
Uncheck the option “Run as dry run?” and click the “Run Search / Replace” button. Once you click the button, the plugin will start searching your WordPress database for all the URLs starting with HTTP and replace it with the secure HTTPS URLs. It may take some time, depending on how much site content you’ve got in the database.
How to Fix Mix Content Error Causing Due to Your WordPress Theme
Nowadays, all themes come with HTTPS, but sometimes it happens that you may have installed a poorly coded WordPress theme, or you’re using an older or outdated theme that doesn’t have any new updates. You may encounter a Mix Content error due to that installed WordPress theme.
To confirm whether your installed WordPress theme is causing this Mixed Content error issue, you’ll need to use the browser’s Inspect tool and look at the resources and where it’s loading from.
Once you find out where the HTTP URL is loading, you’ll need to replace it with HTTPS. It sounds easier, but it can be difficult, especially for beginners, as it isn’t easier to figure out which file contains such HTTP URLs.
How to Fix a Mix Content Error Due to an Installed WordPress Plugin
Sometimes your installed WordPress plugin becomes the reason behind the Mix Content error. Any WordPress plugin that doesn’t follow secure coding standards or doesn’t have a secure HTTPS connection can throw a Mix Content error message. For instance, you download and install the WordPress plugin from a third-party resource instead of a trusted resource. Then it’s likely that you may come across issues like this error message.
However, it’s not recommended to try fixing the plugin. Instead, it would be best to look for an alternative to that plugin and remove the one that causes such errors.
Note:
Suppose you’re still facing this Mixed Content error and not able to solve it manually. We recommend using a plugin like Really Simple SSL while you hire someone to solve the issue. So until it’s fixed, your site visitor doesn’t get impacted, and a negative impression about your website is avoided.
Once You Change Your WordPress Site from HTTP to HTTPS, Notify Google
Google treats both HTTP and HTTPS secured websites differently. Therefore, once you change your WordPress site from HTTP to HTTPS, it’s recommended that you notify Google about it. Hence, it’ll help to avoid any future SEO implications as well.
For notifying Google about changing your site from HTTP to HTTPS, you’ll need to go to your Google Search Console account and from there click on the button “Add Property.”
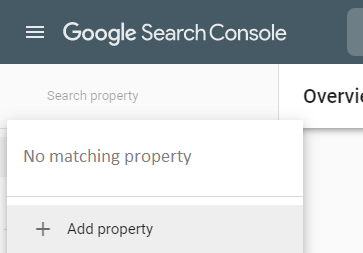
Once you click, it’ll pop up where you’ll need to add your site’s address again.
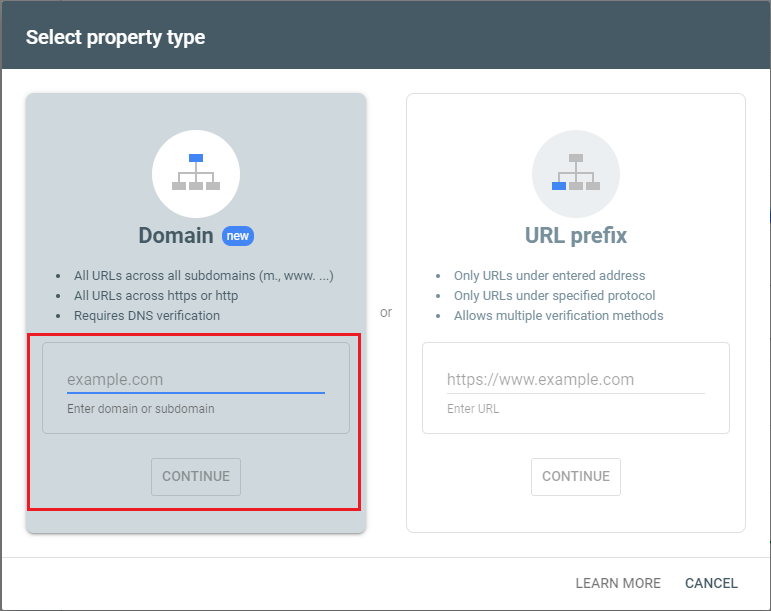
Once “Select property type” opens, enter your website address in the left side “Domain” section and click “Continue.”
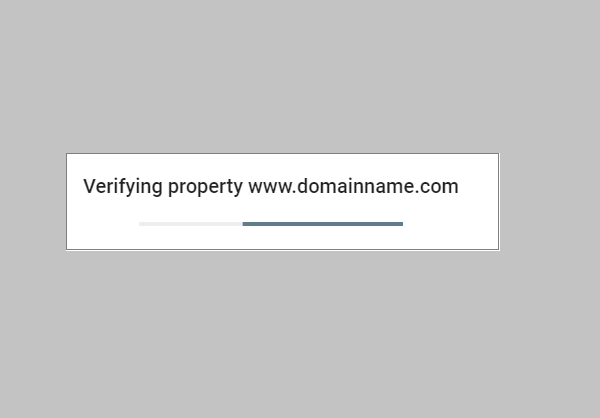
It’ll take time, and once it’s verified, Google will start showing search console reports.
However, be sure that you’ve added both the secure HTTPS and non-secure HTTP versions in your Google Search Console. In that way, Google will find out you’ve shifted to a secure HTTPS connection and notifying them of the same.
And, by doing so, Google will start treating the HTTPS version of the website as a primary version. Also, in combination with the 301 redirects you set up earlier, Google will quickly transfer all your search rankings to secure HTTPS versions of the website while providing improvements in the search rankings.
Why Should You Care About HTTPS and SSL/TLS Certificates?
In the last few years, Google has made it mandatory for every website to have an SSL/TLS certificate installed. Any failure to comply with the policy results in a “Not Secure” warning in the address bar, and at worse, your site can even stop loading on user’s browsers.
Furthermore, Google also marks contact forms and other types of forms insecure whenever any user tries filling in any information. Therefore, it can leave a negative impression of your website to visitors.
And, if your site deals with financial transactions such as the eCommerce website, then without SSL, big payment companies like PayPal Pro, Authorize.net, and Stripe won’t accept payments.
WordPress SSL Certificate
Protect your WordPress website with HTTPS and daily malware scanner at CheapSSLsecurity. It includes 256-bit encryption, 15K warranty, 99% browser support, and more.
Closing Thoughts on Changing Your WordPress Website from HTTP to HTTPS
SSL installed websites aren’t new anymore. And for websites without SSL installed, Google goes out of its way to punish them with visible warning messages that can give the wrong impression to website users.
However, once you complete this tutorial on moving your WordPress site from HTTP to HTTPS, you will have converted your non-secure HTTP website to a secure HTTPS website!