Microsoft IIS 8 .PFX File Import and Export
All windows servers use .pfx formatted SSL Certificate files during the installation process. A PFX backup file is mandatory to transfer the SSL certificate from one server to another.
In Microsoft IIS 8, to configure the SSL Certificate the user must perform the following steps:
- Download & Save PFX files.
- Export the PFX to IIS 8.
- Import the PFX SSL File.
- Enable SSL Certificate file on IIS 8 Server (no Binding for HTTPS). OR
- Enable SSL Certificate file on IIS 8 Server (Binding for HTTPS)
Note: Before adding the .pfx file into IIS 8, the user must install the SSL Certificate into IIS 8.
Now, let’s expand a little bit on the steps we listed above.
Step 1: Download and Save PFX Files
Once the user completes the Certificate issuance process, and the Certificate Authority (CA) verifies Domain/Business/Both, they will issue the Certificate file via email. The user needs to download the SSL certificate files (in PFX format) and save them at a safe location on the server or on a local drive.
You can use your CA Dashboard to download the issued SSL certificate files.
Note: If the Files provided by CA are not in .pfx format, you can use the online SSL converter tool.
Step 2: Export the PFX File to IIS 8
- From the Start Menu, type MMC, and press
- Or press Windows + R, type MMC, and press
- Click on File > Add Remove Snap-ins or press Ctrl + M.
- A new dialogue box will appear.
- Here, from the list of snap-ins, select Certificates and click the Add>
- Pick the appropriate Computer account, click on
- Click Local Computer > Finish.
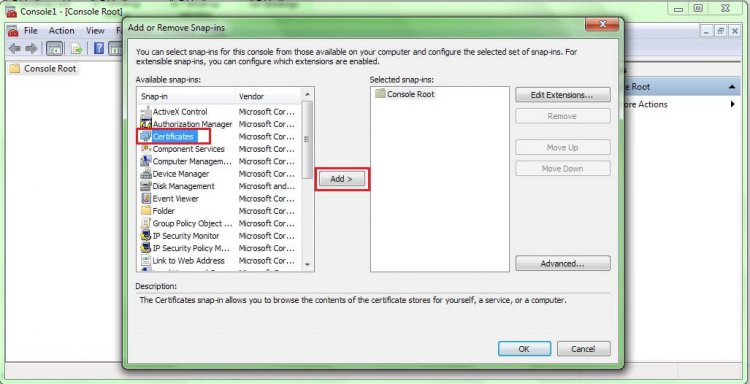
- Now, from the Add or Remove Snap-ins window, click OK.
- From the Console window, from Console Root folder, expand Certificates (Local Computer) (the certificate file will be in Personal or Web Hosting folder).
- Now right-click on the certificate file which you are wishing to export.
- Click All Tasks > Exports, a new Certificate Export wizard will appear.
- Click the Next
- From Export Private Key window, choose Yes, export the private key and press the Next
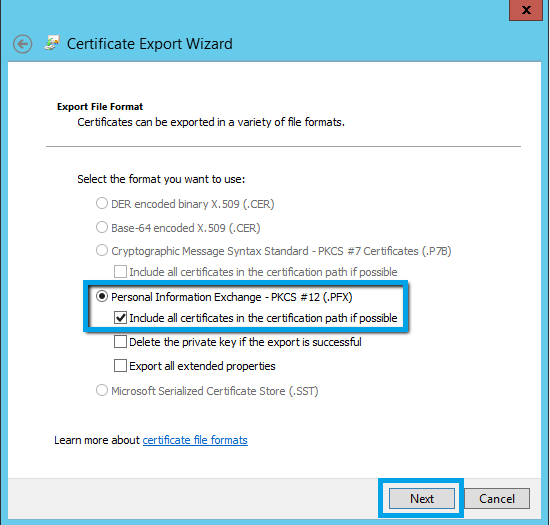
- In file format selection window, Personal Information Exchange – PKCS #12 (.PFX), then check for Include all certificates in the certification path if possible option and click the Next
- In the security window, enter a password and click the ‘Next’ button.
- Browse the location of the file where you are wishing to export the certificate and press Next.
- Now from the Completing the Certificate Export Wizard, validate whether the settings are correct or not and press the Finish
- With ‘The export was successful’ alert message, .pfx file is successfully exported to the location which you have selected.
Step 3: Import the PFX file
- From the Start Menu, type MMC, and press
- Or press Windows + R, type MMC, and press
- Click on File > Add Remove Snap-ins or press Ctrl + M.
- A new dialogue box will appear.
- Here select the Certificates option and click Add>
- Pick the appropriate Computer account, click on
- Click on Local Computer > Finish.
- Close the Add or Remove Snap-ins
- Click the expand (>) button to check the local directories available in Console root.
- Right-click the certificate file which you are wishing backup.
- Now click on All Tasks > Import.
- A new Certificate Import Wizard will appear.
- Click on Next, browse the .pfx SSL file, again click on
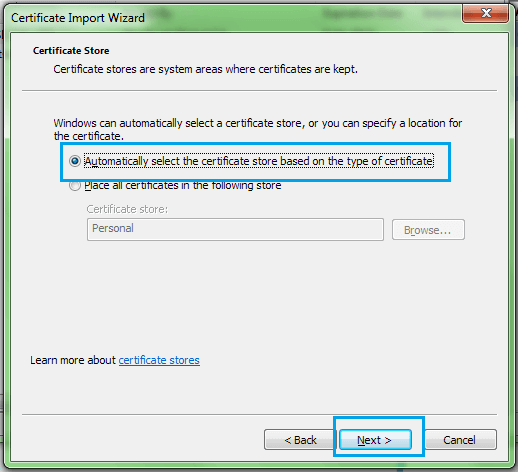
- Select Automatically place the certificates in the certificate stores based on the type of the certificate
- ‘The import was successful’ message will be displayed.
- PFX SSL certificate file is imported successfully, now close the Console
Step 4: Enable SSL Certificate on IIS 8 Server (no Binding for HTTPS)
- From the start menu, search for Administrative Tools, open it and double-click on Internet Information Services (IIS) Manager.
- From IIS manager, click on the Server
- Expand site folders and select the site which you are wishing to secure.
- Now, from the Action Menu, select Bindings… located under the Edit Site
- From the Site Bindings… windows click the Add
- If the binding for https already exists, then select it and click the Edit
- Now,
- Select the Type as HTTPS.
- Assign a Specific IP Address.
- Keep the port as 443 (443 is HTTPS port).
- Select the Hostname for which you are wishing to add the certificate.
- Click the OK
- Finally, the SSL certificate is installed on your server and your website is now ready to use HTTPS.
- Close the IIS Manager.
Step 5: Enable SSL Certificate on IIS 8 Server (Binding for HTTPS)
- From the start menu, search for Administrative Tools, open it and double-click on Internet Information Services (IIS) Manager.
- From IIS manager, click on the Server
- Expand site folders and select the site which you are wishing to secure.
- Now from the Action Menu, select Bindings… located under the Edit Site
- Select the binding for HTTPS option and click on Edit.
- Now,
- Select the Type as HTTPS.
- Assign a Specific IP Address.
- or select All Unassigned if your server comes up carries multiple IP addresses.
- Add the hostname which you are wishing to secure.
- Keep the port as 443 (443 is HTTPS port).
- Select the appropriate imported SSL certificate from the drop-down list.
- Click the OK
- Finally, the SSL certificate is installed on your server and your website is now ready to use HTTPS.
- Close the IIS Manager.
- Restart the IIS 8 Server.
![]() The easy and quick instructions shown here to import and expoert the SSL Certificate on Microsoft IIS 8 server.
The easy and quick instructions shown here to import and expoert the SSL Certificate on Microsoft IIS 8 server.


