Microsoft IIS 7 .PFX File Import and Export
All windows servers are used .pfx formatted SSL Certificate files during the installation process. A PFX backup file is mandatory to transfer the SSL certificate from one server to another.
In Microsoft IIS 7, to configure the SSL Certificate the user must perform following steps:
- Download & Save PFX files.
- Export the PFX to IIS 7.
- Import the PFX File.
- Enable SSL Certificate file on IIS 7 Server.
Now, let’s go into a little bit of detail about the steps we just listed above.
Step 1: Download and Save PFX Files
Once the user completes the Certificate issuance process, and the Certificate Authority (CA) verifies Domain/Business/Both, they will issue the Certificate file via email. The user needs download those SSL certificate files (in PFX format) and saves them at a safe location on the server or in local drive.
You can use your CA Dashboard to download the issued SSL certificate files.
Note: If the Files provided by CA are not in .pfx format, you can use the online SSL converter tool.
Step 2: Export the PFX File to IIS 7
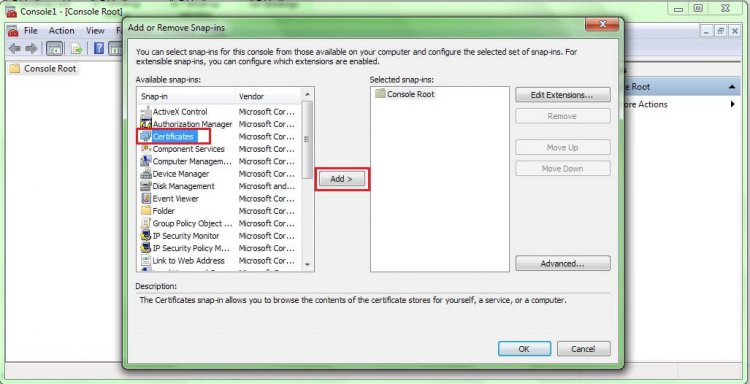
- From the Start Menu, type MMC and press Enter
- Or press Windows + R, type MMC, and press Enter
- Click on File > Add Remove Snap-ins or press Ctrl + M
- A new dialogue box will appear.
- Here select Certificates option and click the Add>
- Pick the appropriate Computer account, click on
- Click on Local Computer > Finish.
- Close the Add or Remove Snap-ins
- Now, right click on the certificate file which you are wishing to export.
- Select All Tasks > Export.
- Select Yes, export the private key & include all certificates in certificate path if possible.
- If it asks to add a password, add it.
- Now save and click the Finish button. You will be alerted with an export successful message.
Step 3: Import the PFX file
- From the Start Menu, type MMC, and press
- Or press Windows + R, type MMC, and press Enter.
- Click on File > Add Remove Snap-ins or press Ctrl + M.
- A new dialogue box will appear.
- Here select Certificates option and click the Add > button.
- Pick the appropriate Computer account, click Next.
- Click on Local Computer > Finish.
- Close the Add or Remove Snap-ins
- Click the expand (>) button to check the local directories available in Console root.
- Now right click on the certificate file which you are wishing backup.
- Now click on All Tasks > Import.
- A new Certificate Import Wizard will appear.
- Click on Next, browse the .pfx file, again click on Next.
- Select Automatically place the certificates in the certificate stores based on the type of the certificate
- The import was successful message will be displayed.
- .PFX SSL certificate file is imported successfully, now close the Console
Step 4: Enable SSL Certificate on IIS 7 Server
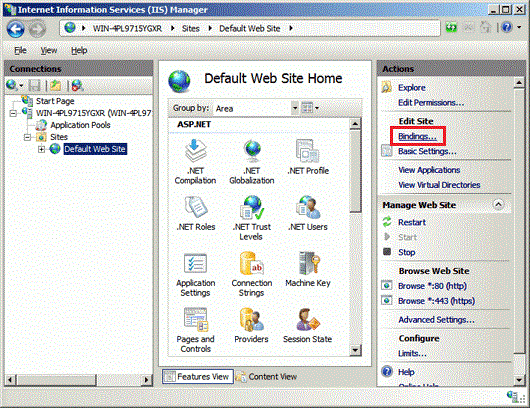
- From the start menu, search for Administrative Tools, open it and double-click on Internet Information Services (IIS) Manager.
- From IIS manager, click on the Server
- Expand site folders and select the site which you are wishing to secure.
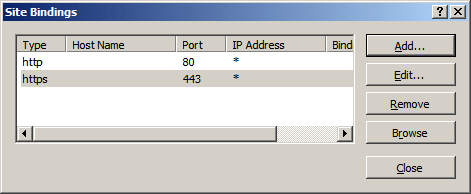
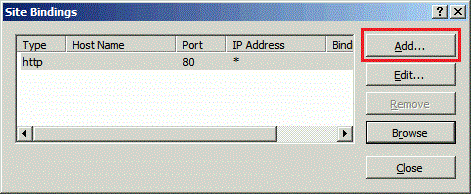
- Now, from the Action Menu, select Bindings… located under the Edit Site
- From the Site Binding windows, click the Add
- If the binding for https already exists, then select it and click the Edit
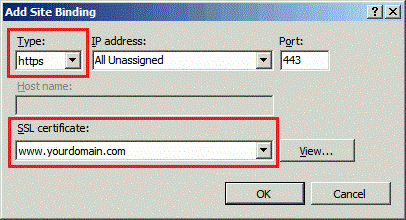
- Now,
- Select the Type as HTTPS.
- Assign a Specific IP Address.
- Keep the port as 443 (443 is HTTPS port).
- Select the Hostname for which you are wishing to add the certificate.
- Click the OK
- Finally, the SSL certificate is installed on your server and your website is now ready for HTTPS.
- Close the IIS Manager.