Here’s how you can easily install an SSL/TLS certificate in Microsoft Lync Server 2013
If you are wondering about installing an SSL certificate on Microsoft Lync Server 2013, you’ve landed on the right page. In this blog, we’ll demonstrate the entire procedure step-by-step so that you don’t face any trouble during the installation. So, roll-up your sleeves, stretch your fingers, put on your glasses (if you wear them) and get started!
Before you begin installing an SSL certificate on Microsoft Lync Server 2013, you must have generated CSR (certificate signing request) and must have your certificate files at your disposal. If you haven’t got them, go straight to our nifty CSR Generation tool, and then purchase a cert from our low-priced range of SSL certificates. Once you’re done with this, you’re good to go!
Here’s how to install an SSL certificate on Microsoft Lync Server 2013
Note: This installation process has been demonstrated using the Lync 2013 interface. Make sure you’re using it.
Closely follow the below-mentioned steps to install SSL on Lync 2013.
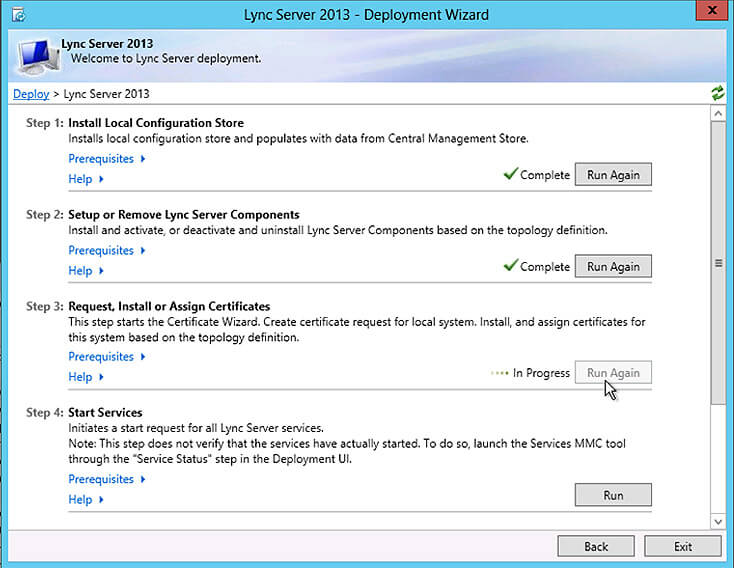
- First, open the Lync Deployment Wizard.
- Go to Welcome to Lync Server deployment page and click on Run in the 3rd Step named Request, Install or Assign Certificates.
- Now Certificate Wizard window will open up. Choose the External Edge certificate option and click on Import Certificate.
- A window named Import Certificate should appear on your screen. Browse to locate your and select your certificate file. Check the Certificate file contains certificate’s private key option and type in the password if the file you selected above contains your private key.
- Click on
- Verify your information in the Summary window and click
- Once you click Next, you’ll see an Executing Commands Below the commands in the middle section, you’ll be able to see the Task status. If it shows completed, you’re good. Click on Finish.
- Now go back to Certificate Wizard main page. Choose the External Edge certificate option and click on Assign.
- Certificate Assignment wizard should appear on Certificate Assignment Click on Next.
- In the Certificate Assignment window, you’ll see Certificate Store Click on View Certificate Details to verify all the certificate assignment details. Click Next once you’re done.
- Check the Certificate Assignment Summary and click on Next if the information is correct.
- Again, click on
- Once you click Next, you’ll see an Executing Commands Below the commands in the middle section, you’ll be able to see the Task status. If it shows completed, you’re good. Click on Finish.
Congratulations! You’ve just installed SSL certificate on Microsoft Lync Server 2013. To verify if the installation went successful, check if the Status column in External Edge Certificate says Assigned.
Important Microsoft SSL Installation Guides
- Install SSL Certificate on Microsoft IIS 7
- SSL Installation Guides for Microsoft Office 365
- Microsoft Azure SSL Certificate Installation process
 List of SSL Certificates that suits best in the Microsoft Lync Server 2013 & other versions available at the lowest price.


