
Editor’s Note: This article on how to migrate WordPress from HTTP to HTTPS was originally published in 2018. It was updated in 2019, 2020, and (most recently) in 2025 to reflect more up-to-date industry recommendations on how to enable HTTPS and make HTTPS the default for your WordPress website.
If you’re a WordPress website owner, it’s high time to migrate your WordPress website from HTTP to HTTPS. While most people know that they’re supposed to do this, not everyone necessarily understands how to go about making the shift from WordPress HTTP to HTTPS.
In this article, we’ll show you how to keep your website secure and Google-friendly by migrating WordPress from HTTP to HTTPS. We’ll explain how to switch to HTTPS in a way that helps you understand not just how but why you should migrate your WordPress website.
Prerequisites Before You Can Switch WordPress from HTTP to HTTPS
Before you start the process of migrating WordPress from HTTP to HTTPS, you need to have the following details sorted:
Buy a Publicly Trusted SSL/TLS Certificate.
You need an SSL certificate that digitally binds a cryptographic key to your website’s digital identity. This enables secure, encrypted connections from the web server to a browser. If you choose an SSL/TLS certificate with business validation as a minimum (i.e., an organization validation or extended validation SSL/TLS certificate), then you’ll have an added layer or protection that comes in the form of authentication.
You should select a 2048-bit key certificate or higher. Some of the popular vendors for SSL certificates are DigiCert, GeoTrust, Sectigo, RapidSSL, and others.
Generate a CSR and Private Key
You’ll need to generate a certificate signing request (CSR) and private key before you can generate your SSL certificate. Most web hosting platforms (like cPanel) provide a simple interface for you to complete this. You’ll need to upload your CSR to your certificate provider to get the certificate authority (CA) to issue your SSL certificate.
Once the certificate has been issued, you must download it so it can be installed on your server.
The Process to Migrate a Website from HTTP to HTTPS in WordPress
1. Install the SSL/TLS Certificate
Provide your web host with your certificate and private key to finalize the installation of SSL into your WordPress. Once done, make sure everything is alright by running an SSL Server Test.
![]()
Protect Your Website with Affordable SSL Certificates
Secure your website and build trust with our SSL/TLS certificates, starting at just $5.45/year. Choose from DV, OV, EV, Wildcard, and Multi-Domain options.
Now that your hosting account is SSL-enabled, you can start the process to migrate WordPress itself from HTTP to HTTPS in WordPress.
2. Update WordPress Settings to Redirect URL to HTTPS
You need to inform WordPress that you’ll be using HTTPS from now on. To do so, log into your WordPress admin dashboard and go to Settings > General Settings. In the WordPress Address (URL) and Site Address (URL), enter the HTTPS URLs for your website, like this:

3. Redirect All HTTP Requests to HTTPS
Now that you’ve made that update, your website is (at least somewhat) functional with both the unsecured HTTP and the secured HTTPS version. However, there’s still more work to do. You must make your website and all associated files accessible exclusively via HTTPS. This will ensure that whenever someone enters the HTTP version of your URL, they are automatically redirected to the new HTTPS URL.
As such, all your HTTP links will continue working, but visitors will be automatically redirected, so they still only have access to the HTTPS version of your website.
To achieve this, go to .htaccess and add the following rules:
RewriteEngine On
RewriteCond %{HTTPS} off
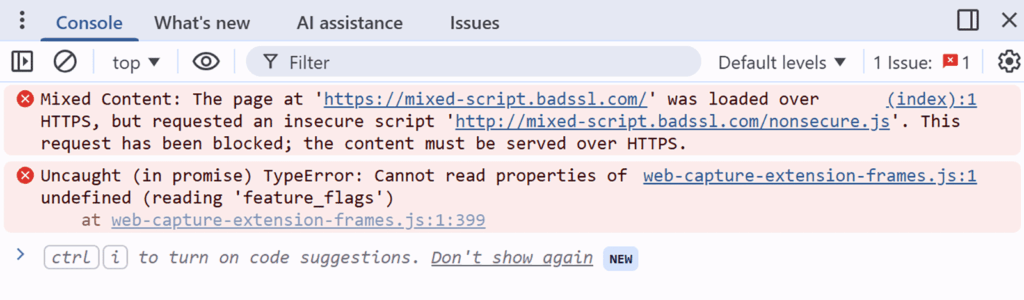
RewriteRule (.*) https://%{HTTP_HOST}%{REQUEST_URI} [R=301,L]4. Use WordPress Plugins to Fix Mixed Content Warnings
If you receive a mixed content warning like this on your site, then your site still contains images and media files using HTTP URLs:
To ensure your site isn’t displaying any mixed content warnings and does display the secure padlock icon or “Connection is secure” message, then do one of the following:
- Update your PhpMyAdmin (or the database tool offered by your hosting provider) manually to run commands that automatically update HTTP URLs to HTTPS (not recommended).
- Use a WordPress plugin (recommended).
Some examples of WordPress plugins you can use include:
- Really Simple Security (formerly known as Really Simple SSL)
- SSL Insecure Content Fixer
- One Click SSL
5. Enable HSTS to Force HTTPS Connections
If you need, you can modify your SSL settings to your liking. One recommended change is enabling HTTP Strict Transport Security (HSTS), which protects your website from protocol downgrade attacks and cookie hijacking. You can either choose to do this manually by adding rules to your .htaccess file or by using a WordPress plugin, such as Headers Security Advanced & HSTS WP.
To achieve this, go to your WordPress site’s .htaccess file and add the following rules:
# Enable HSTS
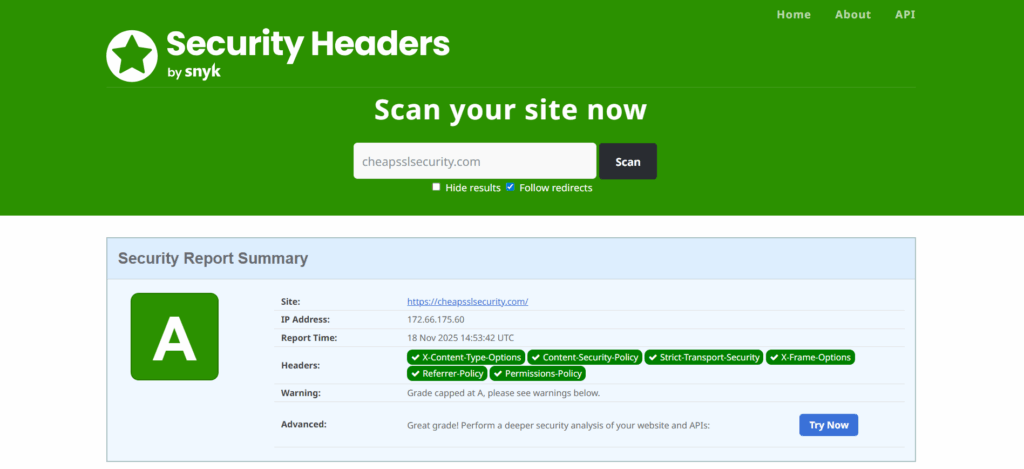
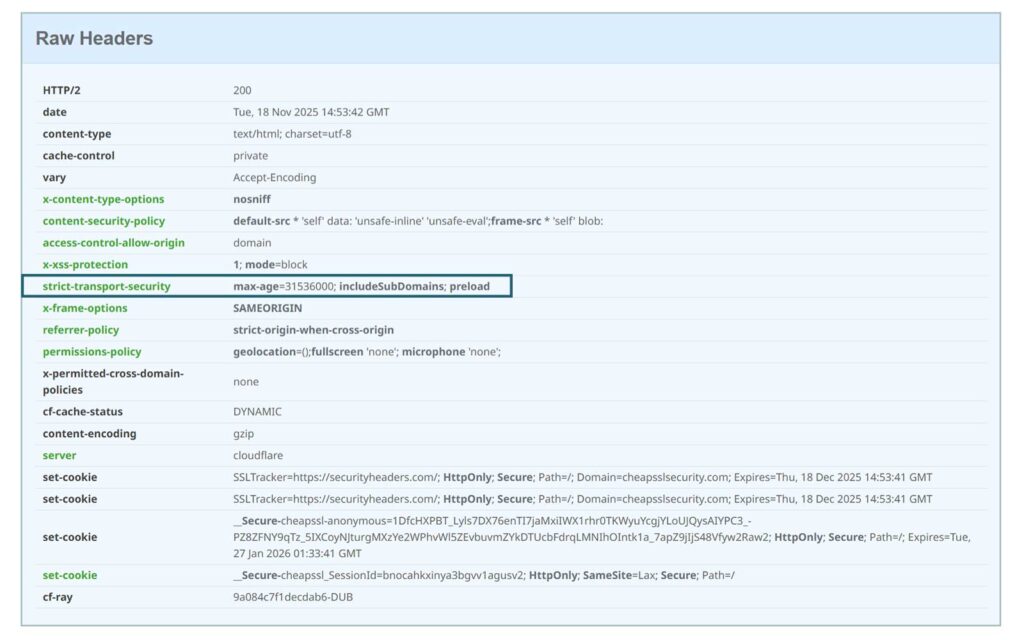
Header set Strict-Transport-Security "max-age=31536000; includeSubDomains" env=HTTPSUse the securityheaders.com scan tool to check your site’s security headers, For example, here’s part of the report for CheapSSLsecurity.com:
Pro Tip: Search for Any Lingering HTTP Links
You can use the search and replace feature in a WordPress plugin like Better Search Replace. This approach allows you to substitute URLs that start with the insecure HTTP protocol with those that start with HTTPS instead.
After you install an SSL/TLS certificate and incorporate all the aforementioned changes, your WordPress site will be completely migrated from HTTP to HTTPS.
![]()
Protect Your Website with Affordable SSL Certificates
Secure your website and build trust with our SSL/TLS certificates, starting at just $5.45/year. Choose from DV, OV, EV, Wildcard, and Multi-Domain options.
Importance of HTTPS in WordPress
HTTPS means that your communication with the website is secured against eavesdroppers. HTTPS stands for “hypertext transfer protocol secure.” It’s the same as HTTP, but with the added “secure” at the end, which makes all the difference.
When you visit a website using the traditional (insecure) HTTP protocol, your communication with the site is unencrypted. That’s okay if you’re reading public, non-sensitive information on a website. However, if you intend to transmit or receive confidential information — payment details, billing details, login info, contact details, etc. — the data you transmit can be easily compromised because it’s sent in plaintext.
Browsers Have Been Pushing Websites to HTTPS for Years (For Good Reason!)
For more than a decade, largely in part due to an increase in cyber attacks and digital spying, Google has pushed to incentivize website owners to migrate from HTTP to HTTPS in WordPress (and across other platforms). As such, if you don’t have an HTTPS website, Google will show a “not secure” warning on the header next to your URL and penalize your site’s search rankings.
After you incorporate all the aforementioned changes, your WordPress site will be completely migrated from HTTP to HTTPS.


