
Microsoft Exchange Server 2010 SSL Installation Steps.
Before you start the SSL installation process on your MS exchange server, make sure that you have the CSR and Private key with you; or else generate the CSR and private key from here.
Step 1: Download SSL Certificate Files
After completing the SSL Certificate purchase process, you can download your SSL certificate or a Certificate Authority (CA) will email your certificate, which will contain Primary, Intermediate and Root certificate in a zip folder. Now, you can download that zip file and extract it to a particular root directory, where you wish to store your certificate files.
Step 2: Add Snap-ins in MMC (Microsoft Management Console)
- In Start menu, Type MMC & click on it or else write Windows+ R, then type MMC and press Enter.
- Console1 screen will appear
- from File Menu click on Add/Remove Snap-ins or else type Ctrl + M
- Select Certificates from Available snap-ins: console and click on Add
- Select a specific computer account and click Finish
- After reaching on Add or Remove Snap-ins dialogue, click on OK
Step 3: Install Intermediate SSL Certificate
- Expand Certificate under the Console Root folder
- Now right click on Intermediate Certificate, hover the mouse on All Tasks and click on Import.
- Press Next button, click on Browse, search for your intermediate Certificate file
- Then press Next, select ‘Place all certificates in the following store’ & press Browse button, now from the list of Certificate stores select Intermediate Certificate Authorities & click
- Certificate Import Wizard will appear, verify your certificate and press Finish.
- The Import was Successful alert message will appear, press OK
- Save the Console and Close MMC.
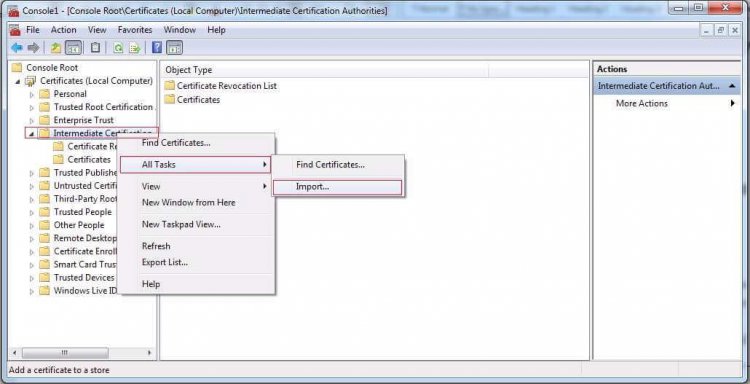
You have successfully imported the intermediate certificate file.
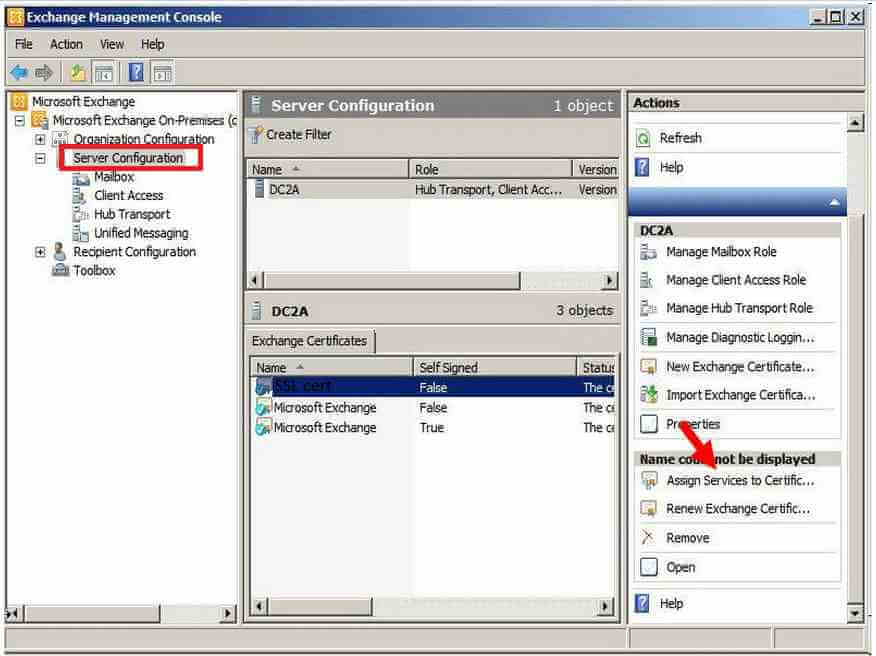
Step 4: Install the SSL Certificate File
- From Start menu, click on the following path. All Programs > Microsoft Exchange Server 2010 > Exchange Management Console
- From Exchange Management Console, follow Microsoft Exchange On-Premises > Manage Databases
- Click on Server configuration.
- Now from Exchange Certificates window, select your SSL Certificate.
- Click on Complete Pending Request, from the Actions panel located in right corner.
- From Certificate Pending Request window, click on Browse and find the SSL certificate file
- Select your certificate file and press Open.
- Now click on Complete > Finish.
- From Exchange Management Console, select your SSL certificate in Exchange Certificate.
- Assign Services to Certificate from the Actions menu in the right corner.
- Select the Server which you wish to assign service from Assign Services to Certificate window and press Next.
- Now, select the services you wish to assign to your certificate and press Next.
- Click on Assign and then press Finish.
Your SSL Certificate is now installed.
Important Resources
- SSL Certificate Installation Checker
- Microsoft Exchange Server Support Center
- Install SSL Certificates on Microsoft Exchange Server 2007
Guides on How to Move SSL Certificate from One Server to Another Server
- Transfer an SSL Certificate from a Windows Server to an Apache Server
- Transfer an SSL Certificate from an Apache Server to another Apache Server
- Transfer an SSL Certificate from an Apache Server to a Windows Server
- Transfer an SSL Certificate from a Tomcat/Java Server to an Apache Server
Before Installing SSL on Exchange Server 2010
![]() Microsoft Exchange Server 2010 only accepts SSL Certificate from a genuine and trusted SSL Certificate Authority. Buy trusted SSL Certificate from at a cheap price with heavy discount rates.
Microsoft Exchange Server 2010 only accepts SSL Certificate from a genuine and trusted SSL Certificate Authority. Buy trusted SSL Certificate from at a cheap price with heavy discount rates.


