Here’s how to install an SSL/TLS certificate on Mac OS X El Capitan
Mac OS X El Capitan (v.10.11) is the twelfth major version of Apple’s macOS. This operating system is widely used in Macintosh computers. This article will help you ease through SSL/TLS certificate installation on Mac OS X El Capitan (v.10.11) and beyond.
Before we dive into SSL/TLS certificate installation on Mac OS X El Capitan, you need to know a few things. First, you’ll need to have a CSR (certificate signing request). Without a CSR you won’t be able to purchase an SSL certificate, let alone install one. The first portion of this blog will focus on the CSR generation process on macOS. If you have already generated your CSR, you can skip down to the installation part by clicking here.
Generating CSR for Mac OS X El Capitan
We will tell you what other sites won’t: CSR generation is super-easy. Other websites will take you through an arduous process, but we won’t. For your comfort, we have developed an awesome, free-to-use CSR Generation tool. Generating a CSR in your browser is much easier than doing it on your server.
If you haven’t bought an SSL/TLS certificate, you just got lucky! That’s because no other SSL certificate provider provides certs at the prices that we offer. Check out our super-affordable range of products, make an order and paste the CSR you just generated right there. It’s that simple.
Now that you’ve just generated your CSR and have your SSL certificate on hand, let’s get to work on the installation procedure.
Installing an SSL/TLS Certificate on Mac OS X El Capitan (v.10.11)
Note: We assume that you’re done with the CSR creation as well as the certificate purchase processes. If not, refer the first portion of this post.
Your certificate issuing authority would have sent you the certificate files via email. Don’t get confused when you see two certificate files; you’ll need both. One of these files is called an ‘intermediate certificate.’ And the other one would be your SSL certificate. First, you’ll need to install your intermediate certificate. Let’s get it done.
Install your intermediate certificate
Carefully follow the instructions given in the steps below to install the intermediate certificate on Mac OS X El Capitan (v.10.11).
- First, save the zip file you’ve received on your server and extract them to a folder
- Now open the Mac OS El Capitan (v10.11) Server App
- On the left-hand sidebar, click on Applications listed under Favorites. Then select Utilities and click Keychain Access.
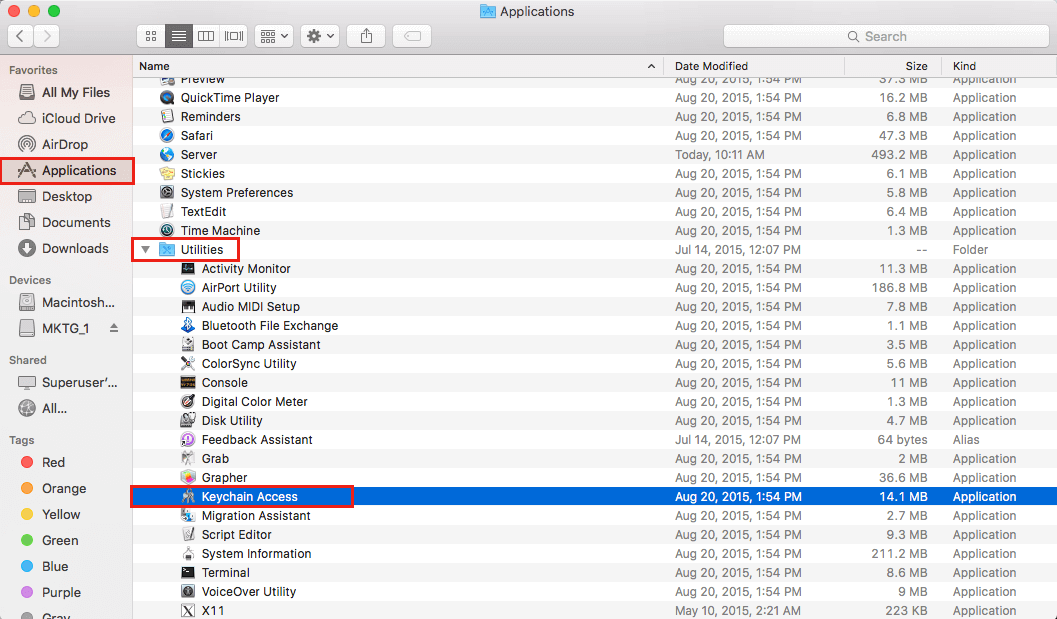
- In the Keychain Access window, select System, listed under Keychain
- Now drag-and-drop the Intermediate Certificate file (.cer or .crt) into the System folder
- Finally, enter the administrator’s password and click Modify Keychain to get the change in motion
Install your SSL certificate
Carefully follow the instructions given in the steps below to install SSL certificate on Mac OS X El Capitan (v.10.11).
- On the left-hand sidebar, click on Applications listed under Favorites. Then double-click on Server
- A Server App window will appear. Here’s where you’ll have to select the server on which you want to install the SSL certificate
- If you’re going to install it on the current server, click This Mac – YourServerName and press Continue. Enter your Administrator Name and Password and select Allow.
- If you want to install it on another server, Select Other Mac – YourOtherServerName and press Now enter your Host Name/IP Address, your Administrator Name, and Administrator Password and then click on Allow.
- In the Server App window, click on Certificates located under Server
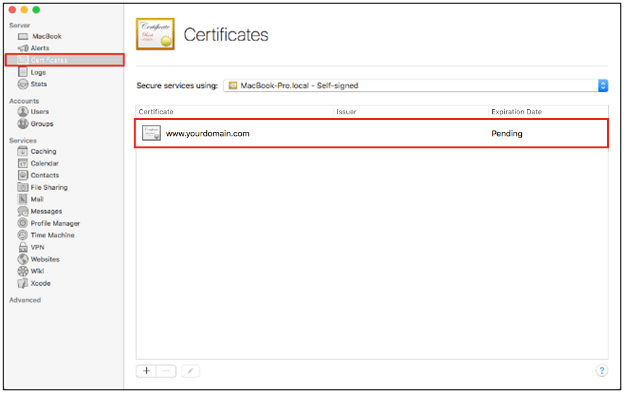
- Now select the Pending certificate in the Certificates window
- Drag-and-drop your certificate file (.crt or .cer) in the box
- Press OK
Assign your Certificate
- Go back to the Server App window and click on Certificates located under Server
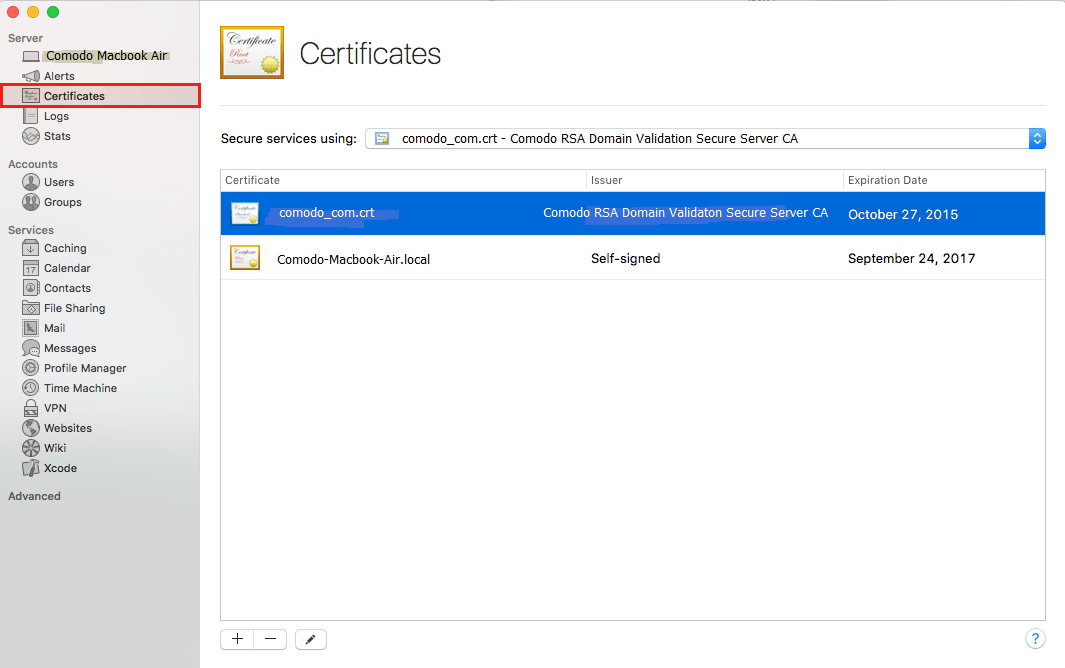
- Click on Secure services using the drop-down list and select Custom
- A window named Service Certificates will open up. Select the service for which you want to use SSL/TLS certificate. Choose website if you’re going to secure your site
- Once selected, click on Ok
Congratulations! You have just finished installing an SSL/TLS certificate on Mac OS X El Capitan (v.10.11). Wasn’t so hard, was it?
Important Resources
SSL Certificate for MAC OS X
![]() Mac OS X El Capitan server only accepts SSL Certificate from a genuine and trusted SSL Certificate Authority. Buy trusted SSL Certificate from at a cheap price with heavy discount rates.
Mac OS X El Capitan server only accepts SSL Certificate from a genuine and trusted SSL Certificate Authority. Buy trusted SSL Certificate from at a cheap price with heavy discount rates.


