Here’s your step-by-step guide for how to secure your email and data with an email signing certificate
Email encryption is a godsend for many businesses, governments, and organizations that wish to keep their customers’ information secure. It’s also a major benefit and contributes to your organization adhere to regulatory compliance through HIPAA, GDPR, DFARS, PCI, and other important acronyms you’d find in a bowl of alphabet soup. However, knowing how to encrypt email in Outlook 2013 isn’t necessarily something that comes naturally to most users.
Lucky for you, you don’t have to figure it out on your own. We’re here to help. So, let’s get right to it.
We’ll briefly explore the tools you’ll need, then we’ll walk you through (step by step) how to send encrypted email in Outlook 2013.
What You Need to Encrypt Email Certificate in Outlook 2013
First, you’ll need to have the Outlook 2013 app available to use on your machine. Of course, you can use other versions of Outlook to send an encrypted email, but the directions may differ slightly based on the layout of your menu within the software application.
Second, you’ll need a type of X.509 digital certificate that’s known as an S/MIME or email signing certificate. Why? Because this type of certificate is what you’ll use to digitally sign your emails and to encrypt the message, attachment, or other content data of your emails. You can purchase an email signing certificate from any reputable certificate authority (CA) or reseller such as CheapSSLsecurity.com.
Purchase an Email Signing Certificate & Save Up to 74%!
We offer the best discount on all types of email signing (personal authentication) certificates from Comodo CA with prices starting as low as $9.98 per year.
Third, you need to add your S/MIME certificate to the keychain on your computer and configure it in Outlook.
Now that we’ve got that out of the way, let’s get right to the main event.
How to Send an Encrypted Email in Outlook 2013
How to encrypt mail in Outlook 2013 in 4 easy steps?
- Select Options in a new email
- Click on More Options
- Check Encrypt Message Contents and Attachments
- Click OK and close the window
Let’s understand it using screenshots.
- Create a new email in Outlook. Write you message and add any files or attachments you wish to secure within the email. In the menu at the top of your Outlook screen, click on the Options tab. This will open the Options ribbon of tools.
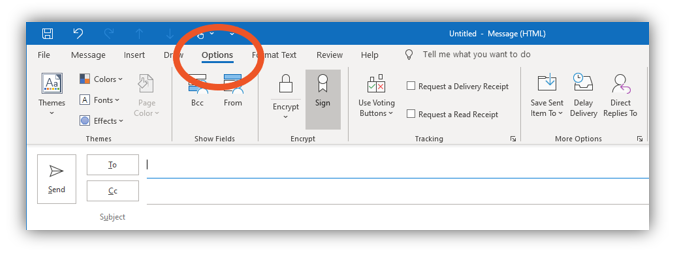
- Click on the arrow besides More Options. This will cause the Properties dialogue box to appear.

- Check the “Encrypt Message Contents and Attachments” box. (If you’re like us and you’re using the Outlook that’s available through the Microsoft Office 365 Business, you may have to click on an additional Security Settings button to find the checkbox option.) You also can select the option to add a digital signature.

- Click OK and close the window. Yes, that’s it. It’s really that simple.
Congratulations! Your email is now encrypted. Now you know how to sign and encrypt email in Outlook 2013.