

Step-by-Step instructions on transferring SSL certificate between servers.
Do you need to export an SSL Certificate from an Apache Server and install it on a Windows Server? Good! You’ve come to the right place. This guide gives step-by-step instructions on how to export your SSL certificate from your Apache Server and places it on your Windows Server. This is necessary for myriad reasons. Maybe you’re switching hosting services, maybe you’re installing a Wildcard or Multi-Domain certificate. Who knows? That’s not important now anyway. Let’s talk about moving SSL Certificate between servers.
Provided you’ve already installed the SSL Certificate on your Apache server (let’s not get ahead of ourselves), this guide breaks down into four categories:
- Convert the SSL Certificate to .PFX
- Copy the .PFX file to the Windows Server
- Import the .PFX file to the Windows store
- Configure the Server
Converting the SSL Certificate to .PFX
This is by far the easiest step. Locate your SSL Certificate, private key and any intermediates, then head to our SSL Converter tool and convert your SSL Certificate and choose .PFX. Instructions are already on the tool page. When you’ve completed this step, head back here for more directions.
Copy the .PFX File to the Windows Server
Next, you need to copy your newly converted .PFX file to the Windows server.
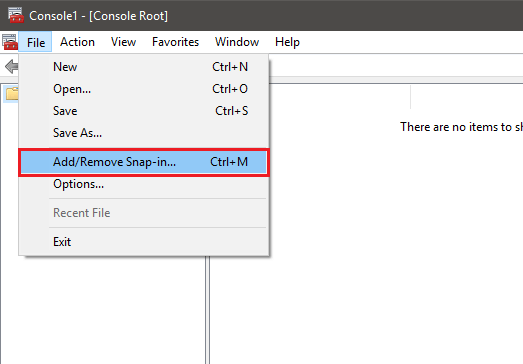
- Click Start, select Run and then type MMC into the field. Click OK.
- Click File, select Add/Remove Snap-In.
- For Windows 2003 users, click the Add button and select Certificates.
- Click Computer Account, then select Next.
- Select Local Computer and click Next.
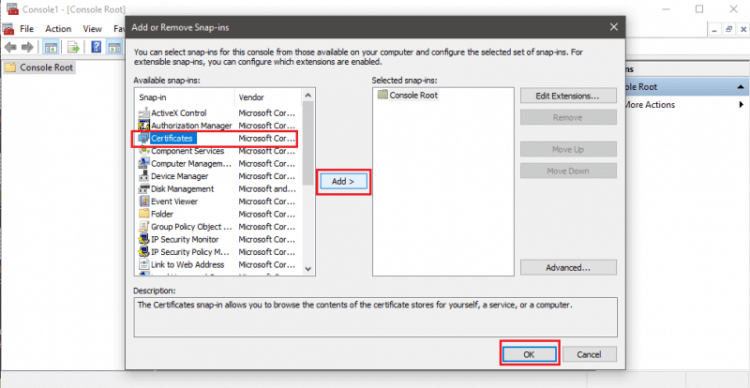
- Right-click the Personal Folder and select All Tasks > Import, then hit OK.
- This should open the Certificate Import Wizard, click Next.
- Select Browse, choose Personal Information Exchange and find your SSL Certificate’s .PFX file.
- Enter the password that was set during the export.
- Select “Mark this key as exportable” and click Next.


Import the .PFX File to the Windows Store
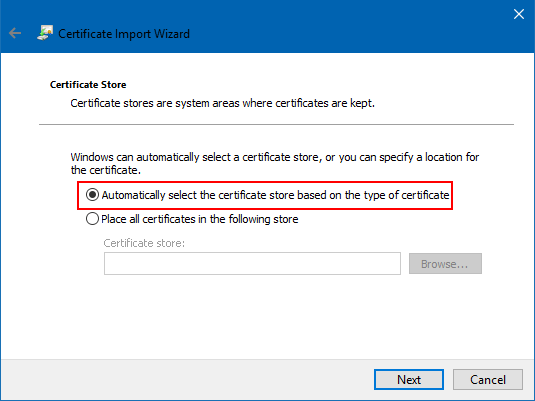
- Select “Automatically select the certificate store based on the type of certificate.” Click Next.
- Click Finish, then refresh.

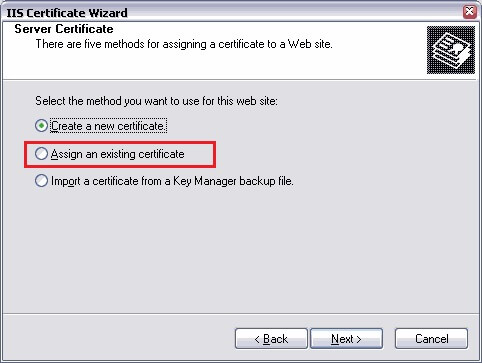
Assigning the SSL Certificate
- In IIS, right-click the website that needs the certificate assigned, click on Properties.
- Click the Directory Security tab.
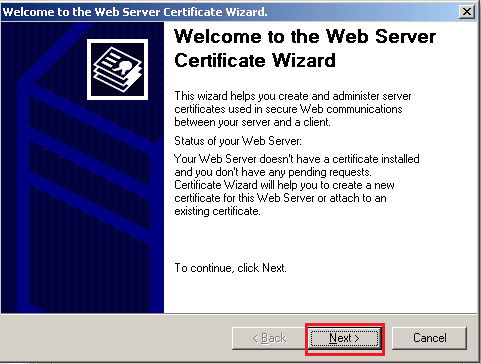
- Click the Server Certificate button, this will launch the Server Certificate Wizard click Next.
- Select “Assign an Existing Certificate.”
- Select Next.
- Select the correct SSL Certificate.
- Click Next.
- Click Finish.


Done. Congratulations!


